코드 노드로 원본을 정리하고 일별 마트 만들기
12분
이 레슨에서 익혀야 할 것
Polars 코드로 API 컬럼 이름을 정리하고 시간별 72행을 일별 3행 마트로 요약합니다.
레슨 03에서 적재한 src_weather_hourly는 API가 준 모양 그대로입니다. 이번에는 컬럼 이름을 읽기 쉽게 바꾸고, 시간별 72행을 날짜별 3행으로 요약합니다.
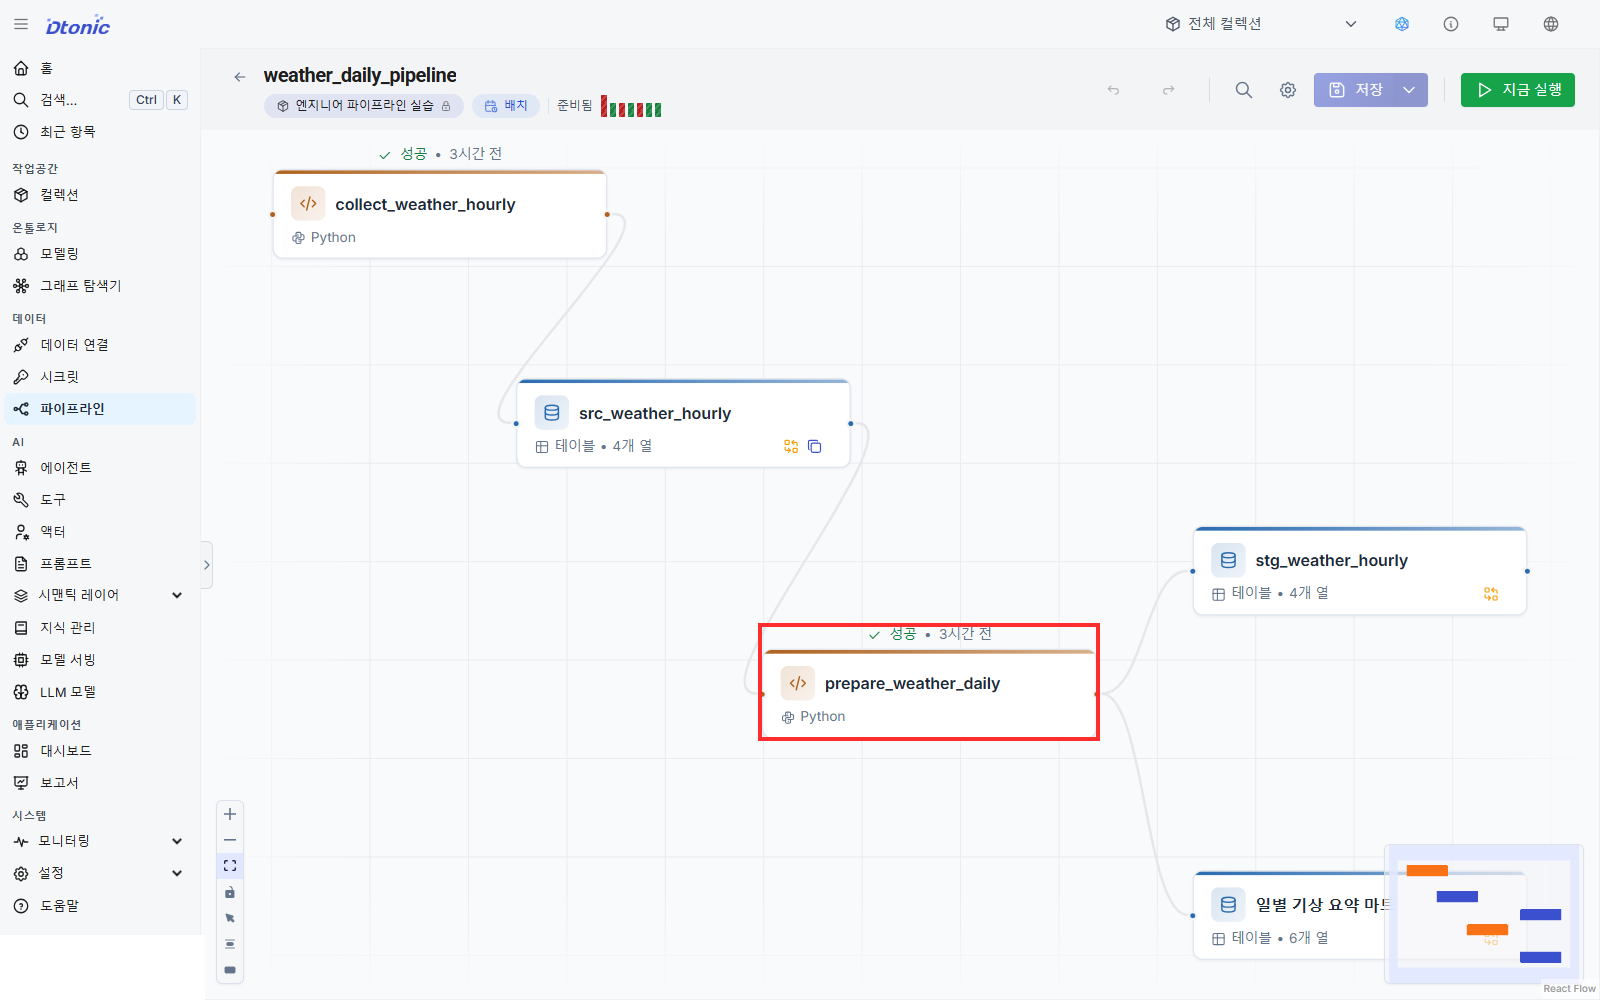
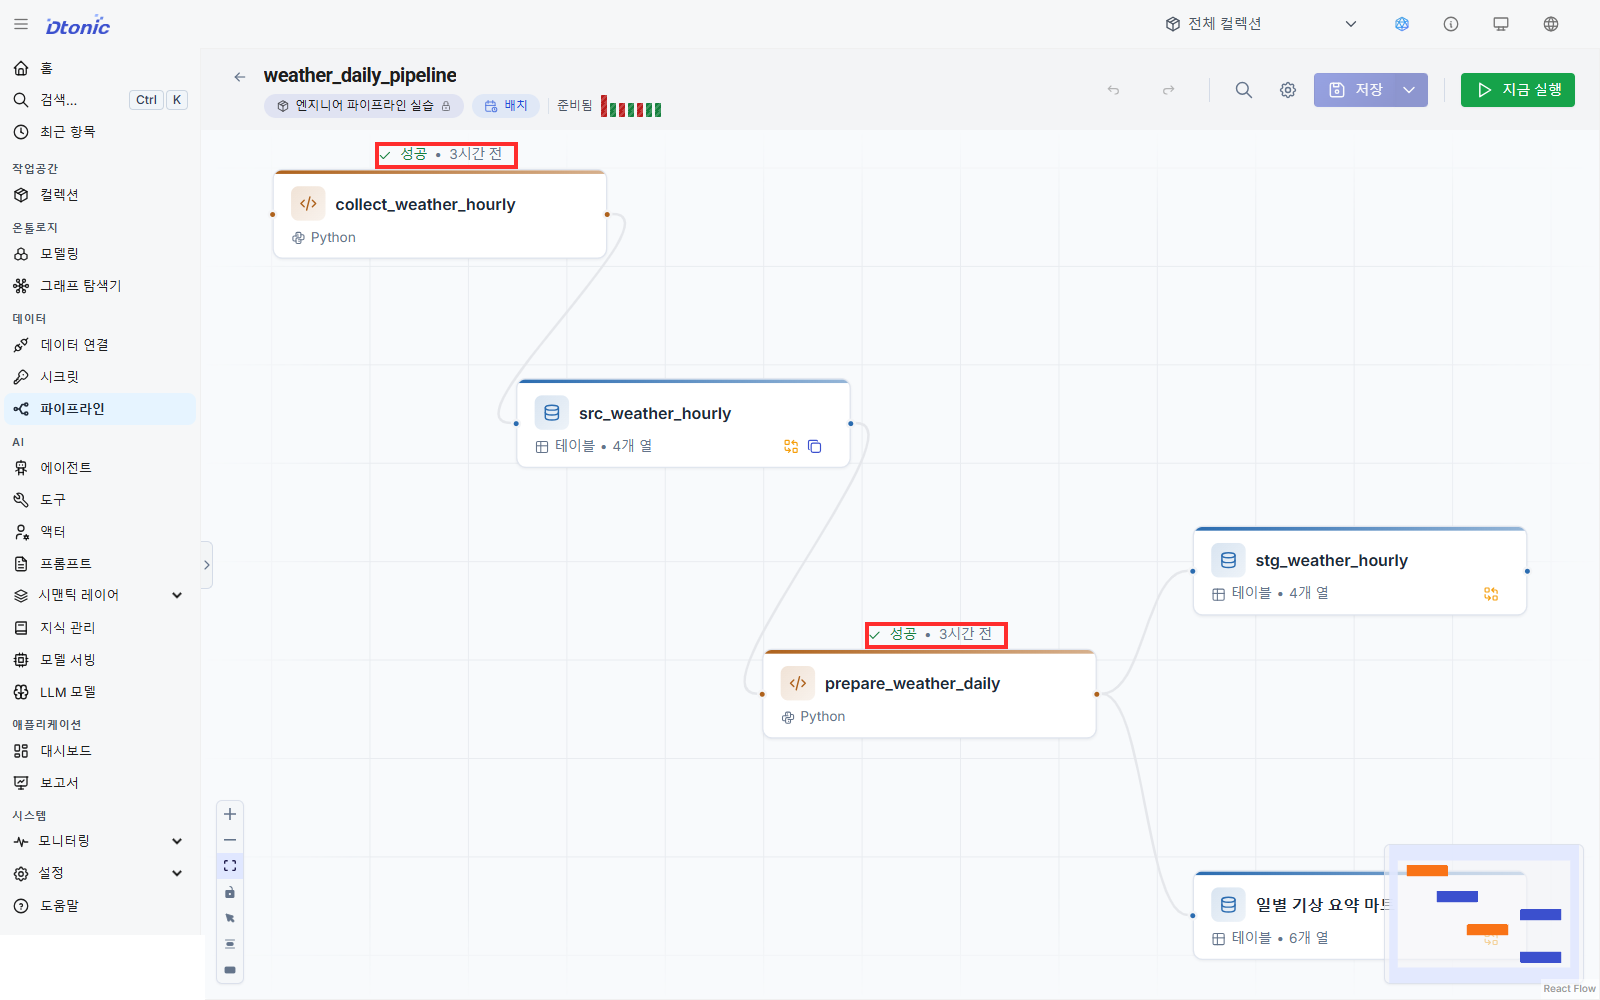
collect_weather_hourly → src_weather_hourly → prepare_weather_daily
                                              ├→ stg_weather_hourly
                                              └→ mart_weather_daily
원본, 정리본, 마트를 따로 남기면 값이 어긋났을 때 어느 단계가 원인인지 좁히기 쉽습니다.
결과 데이터셋 확인하기
레슨 03에서 다음 데이터셋 두 개를 만들었습니다.
stg_weather_hourly:observed_at,observed_date,temperature_c,humidity_pctmart_weather_daily:observed_date,avg_temp_c,max_temp_c,min_temp_c,avg_humidity_pct,sample_count
avg_humidity_pct는 평균값이므로 Double, sample_count는 Bigint입니다.
정리·집계 코드 만들기
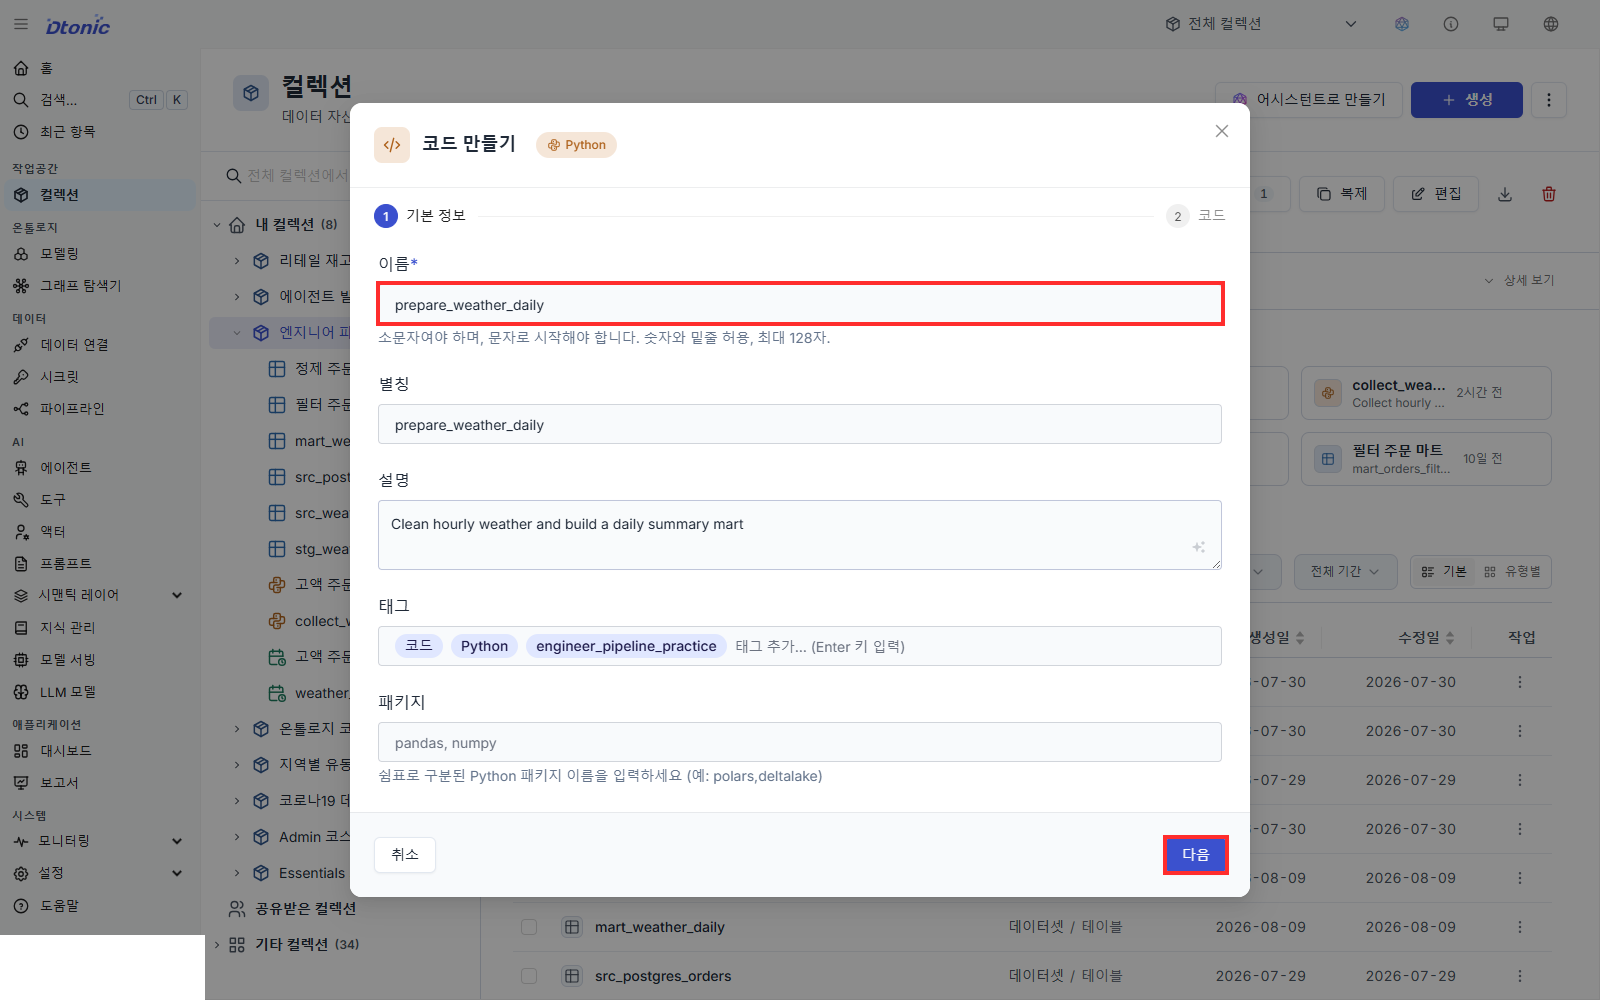
- 실습 컬렉션에서 항목 추가 → 코드 → Python을 선택합니다.
- 이름과 별칭에
prepare_weather_daily를 입력합니다. - 설명에
시간별 기상 데이터를 정리하고 일별 마트를 만듭니다를 입력하고 다음을 선택합니다.
코드 편집기의 내용을 아래 코드로 바꾸고 생성을 선택합니다.
def run(src_weather_hourly, options=None, contexts=None):
    import polars as pl

    frame = src_weather_hourly.rename({
        "temperature_2m": "temperature_c",
        "relative_humidity_2m": "humidity_pct",
    })
    daily = (
        frame.group_by("observed_date")
        .agg(
            pl.col("temperature_c").mean().alias("avg_temp_c"),
            pl.col("temperature_c").max().alias("max_temp_c"),
            pl.col("temperature_c").min().alias("min_temp_c"),
            pl.col("humidity_pct").mean().alias("avg_humidity_pct"),
            pl.col("observed_at").count().alias("sample_count"),
        )
        .sort("observed_date")
    )
    return {
        "stg_weather_hourly": frame,
        "mart_weather_daily": daily,
    }
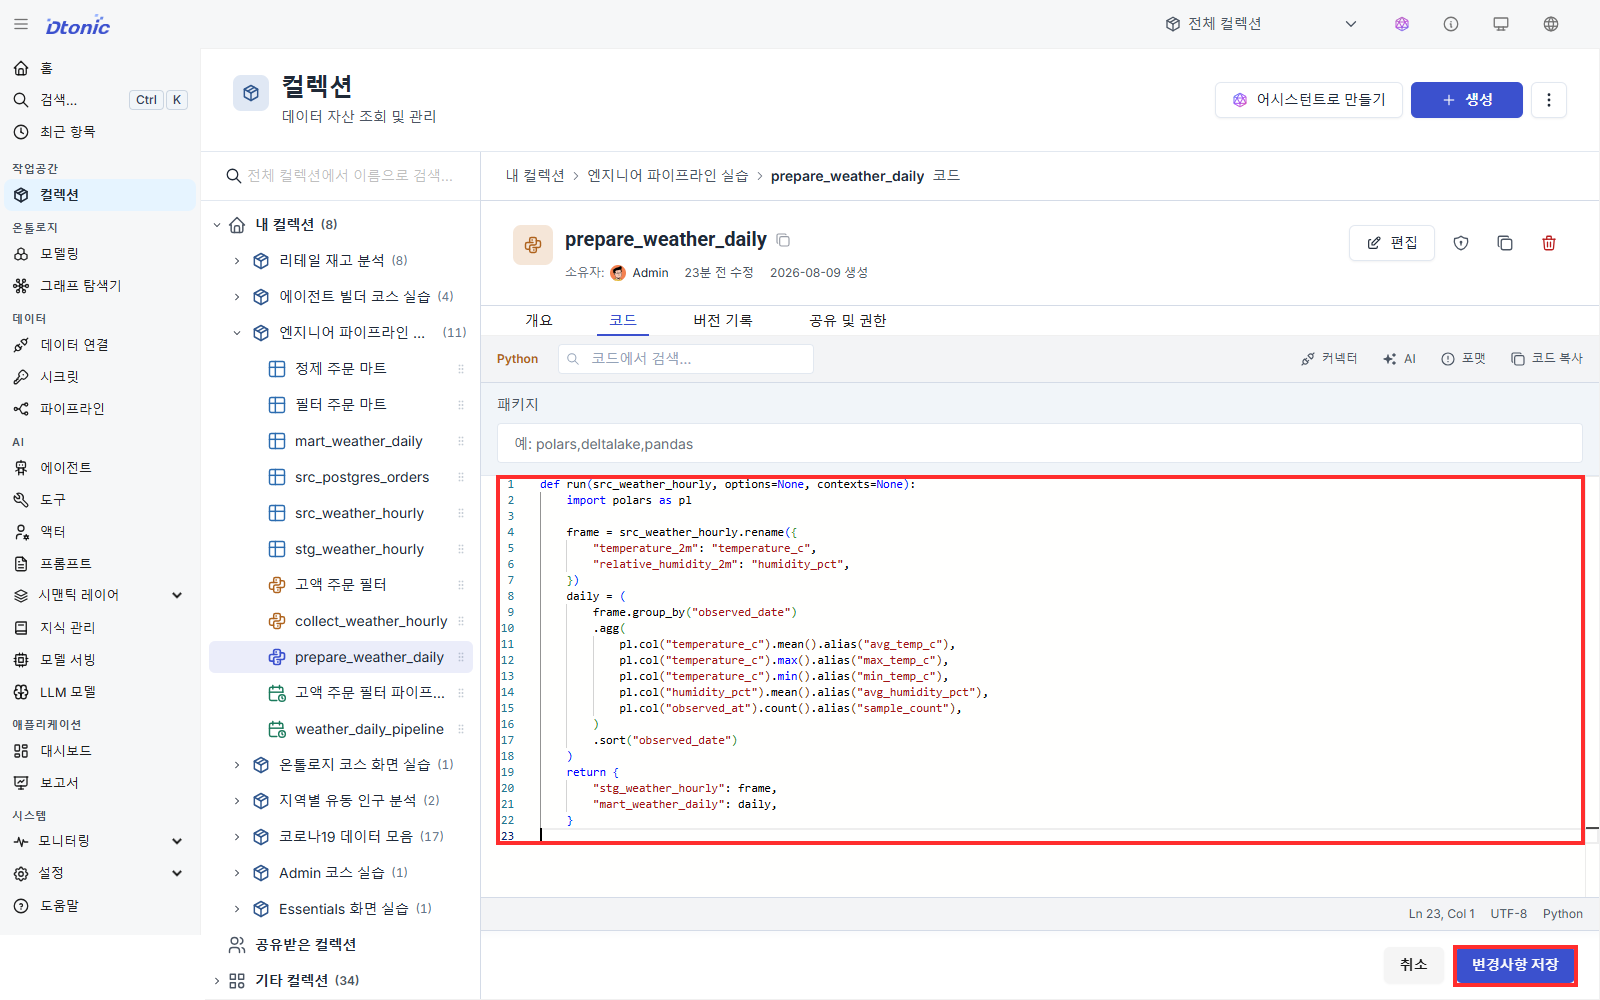
파이프라인이 데이터셋을 코드 노드에 넘길 때의 객체는 Polars DataFrame입니다. 따라서 pandas의 copy()나 groupby()가 아니라 Polars의 rename()과 group_by()를 사용합니다.
파이프라인에 연결하기
weather_daily_pipeline을 엽니다.- 왼쪽 가장자리의 화살표로 컴포넌트 라이브러리를 열고 컬렉션 → 엔지니어 파이프라인 실습을 펼칩니다.
prepare_weather_daily,stg_weather_hourly,mart_weather_daily를 캔버스로 끌어다 놓습니다.src_weather_hourly→prepare_weather_daily로 연결합니다.prepare_weather_daily의 출력을stg_weather_hourly와mart_weather_daily에 각각 연결합니다.
전체 읽기와 전체 교체 설정하기
prepare_weather_daily를 선택하고 옵션 탭을 엽니다.
- 입력
src_weather_hourly를 펼쳐 읽기 모드 → 전체를 선택합니다. - 출력
stg_weather_hourly와mart_weather_daily를 각각 펼쳐 쓰기 모드 → 전체 교체를 선택합니다. - 검사기 아래의 저장을 누른 뒤 파이프라인 상단의 저장을 누릅니다.
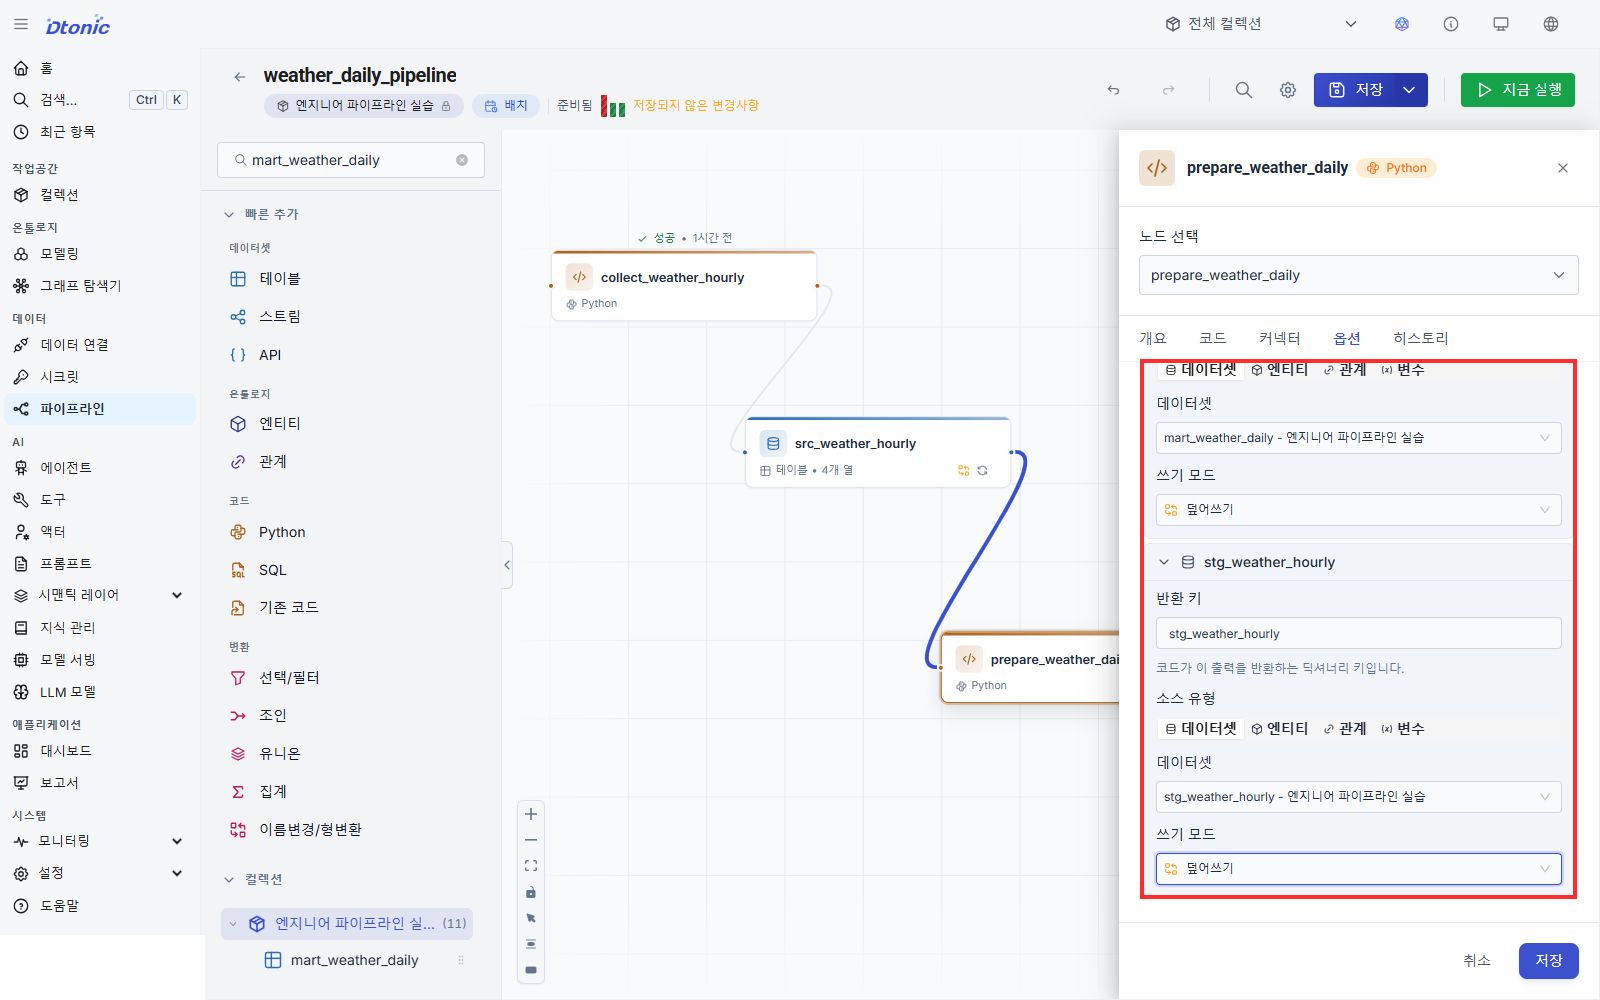
집계는 입력 전체를 봐야 날짜별 결과를 계산할 수 있습니다. 출력은 최근 3일 스냅샷이므로 매 실행마다 교체해야 중복되지 않습니다.
실행 결과 확인하기
- 지금 실행을 선택합니다.
collect_weather_hourly와prepare_weather_daily가 모두 성공인지 확인합니다.stg_weather_hourly의 데이터 탭에서 72행과 바뀐 컬럼 이름을 확인합니다.mart_weather_daily의 데이터 탭에서 날짜별 3행을 확인합니다.
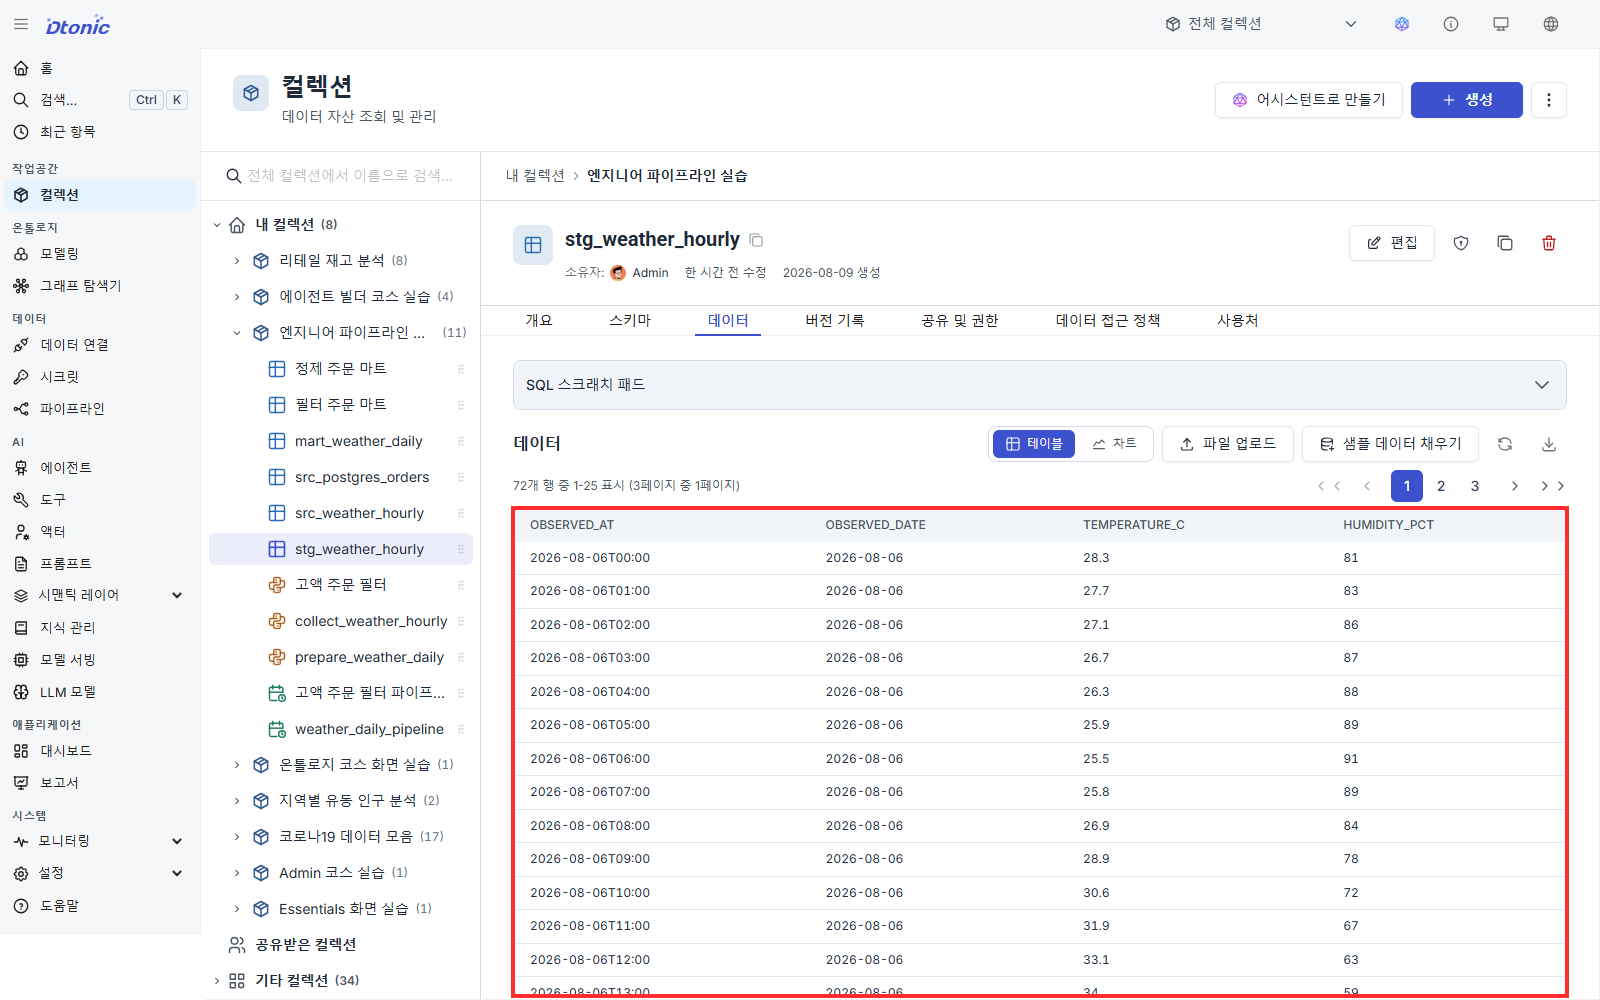
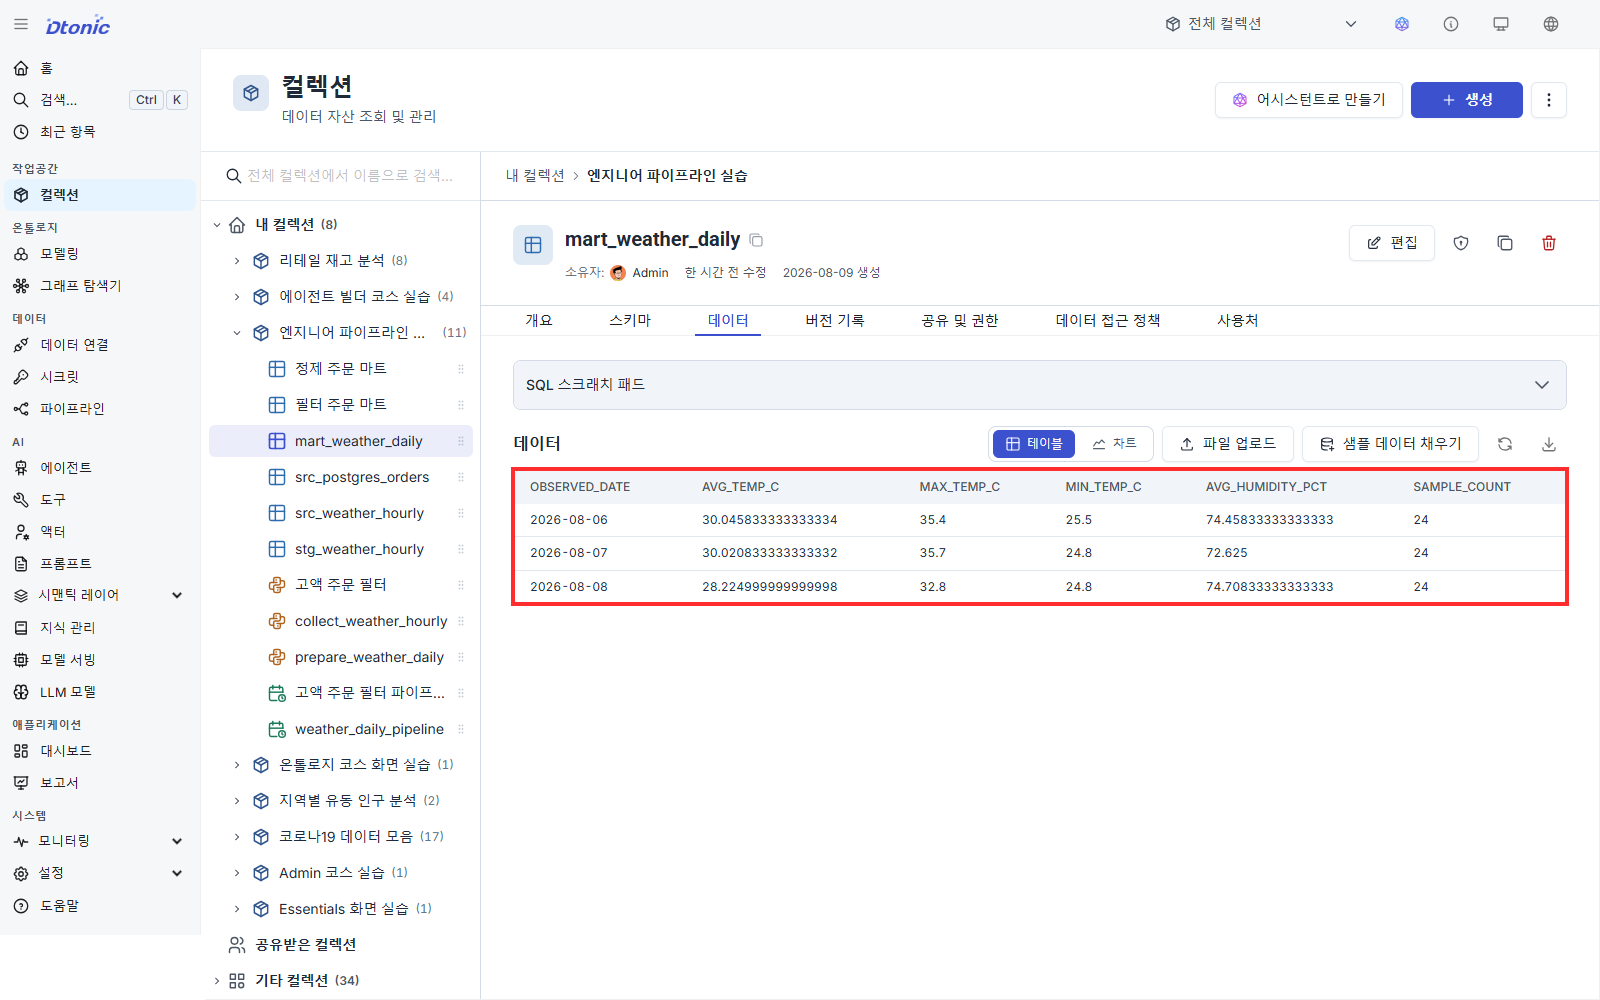
실행 날짜에 따라 값은 달라집니다. 날짜가 3개이고 각 행의 sample_count가 24인지 확인하면 됩니다.
자가 점검
prepare_weather_daily가 Polars 문법을 사용합니다.- 입력은 전체, 두 출력은 전체 교체입니다.
stg_weather_hourly에는 72행과 읽기 쉬운 컬럼 이름이 있습니다.mart_weather_daily에는 날짜별 3행과sample_count = 24가 있습니다.
다음 레슨
다음 레슨에서는 검증한 파이프라인이 정해진 시간에 자동 실행되도록 일정을 설정합니다.
레슨을 마치며
다음 질문에 답하며 이번 레슨의 목표를 달성했는지 확인합니다.
- 안내를 보지 않고 ‘코드 노드로 원본을 정리하고 일별 마트 만들기’ 작업을 다시 수행할 수 있나요?
- 결과가 예상과 다를 때 확인할 지점을 하나 이상 설명할 수 있나요?